- برگشت به هوش مصنوعی
- دستورالعملها
- چت بات دارای RAG
- چت بات چندمنظوره
- چت بات در Slack
- ربات تلگرام مترجم
- کار با Postgres با زبان طبیعی
- شروع به کار با GPT-4.1
- شروع به کار با o4-mini
- شروع به کار با DeepSeek R1
- تولید متن
- تولید متن با ورودی
- استریم متن
- استریم متن با ورودی
- استریم متن با ورودی عکس
- استریم متن Multi-Step
- چتبات مبتنی بر Markdown
- تولید object
- استریم object
- فراخوانی Toolها
- فراخوانی Toolها بهصورت موازی
- فراخوانی Toolها در چندمرحله
- اضافه کردن HITL
- ارسال بدنه سفارشی از useChat
- رندر کردن رابط تصویری در چت
- کش Middleware
- تولید متن
- تولید متن با ورودی
- استریم متن
- استریم متن با ورودی
- استریم متن با ورودی عکس
- تولید آبجکت با مدل استدلالی
- تولید آبجکت
- استریم آبجکت
- استریم آبجکت با ورودی عکس
- ثبت آبجکت نهایی پس از استریم
- فراخوانی Toolها
- فراخوانی Toolها بهصورت موازی
- فراخوانی Toolها با ورودی عکس
- فراخوانی Toolها در چندمرحله
- رهگیری درخواستهای Fetch
- Local Caching Middleware
- NodeJS

- Express

- Hono

- Fastify

- NestJS

- تولید متن
- تولید متن با ورودی
- استریم متن
- استریم متن با ورودی
- تولید آبجکت
- استریم آبجکت
- فراخوانی Toolها
- فراخوانی Toolها بهصورت موازی
رندر کردن رابط بصری در چت NextJS با AI
یکی از پیامدهای جالب استفاده از LLMها که قادر به فراخوانی Toolها هستند، این است که این قابلیت میتواند برای رندر کردن رابطهای بصری از طریق استریم کامپوننتهای React به سمت کلاینت مورد استفاده قرار گیرد.
کلاینت
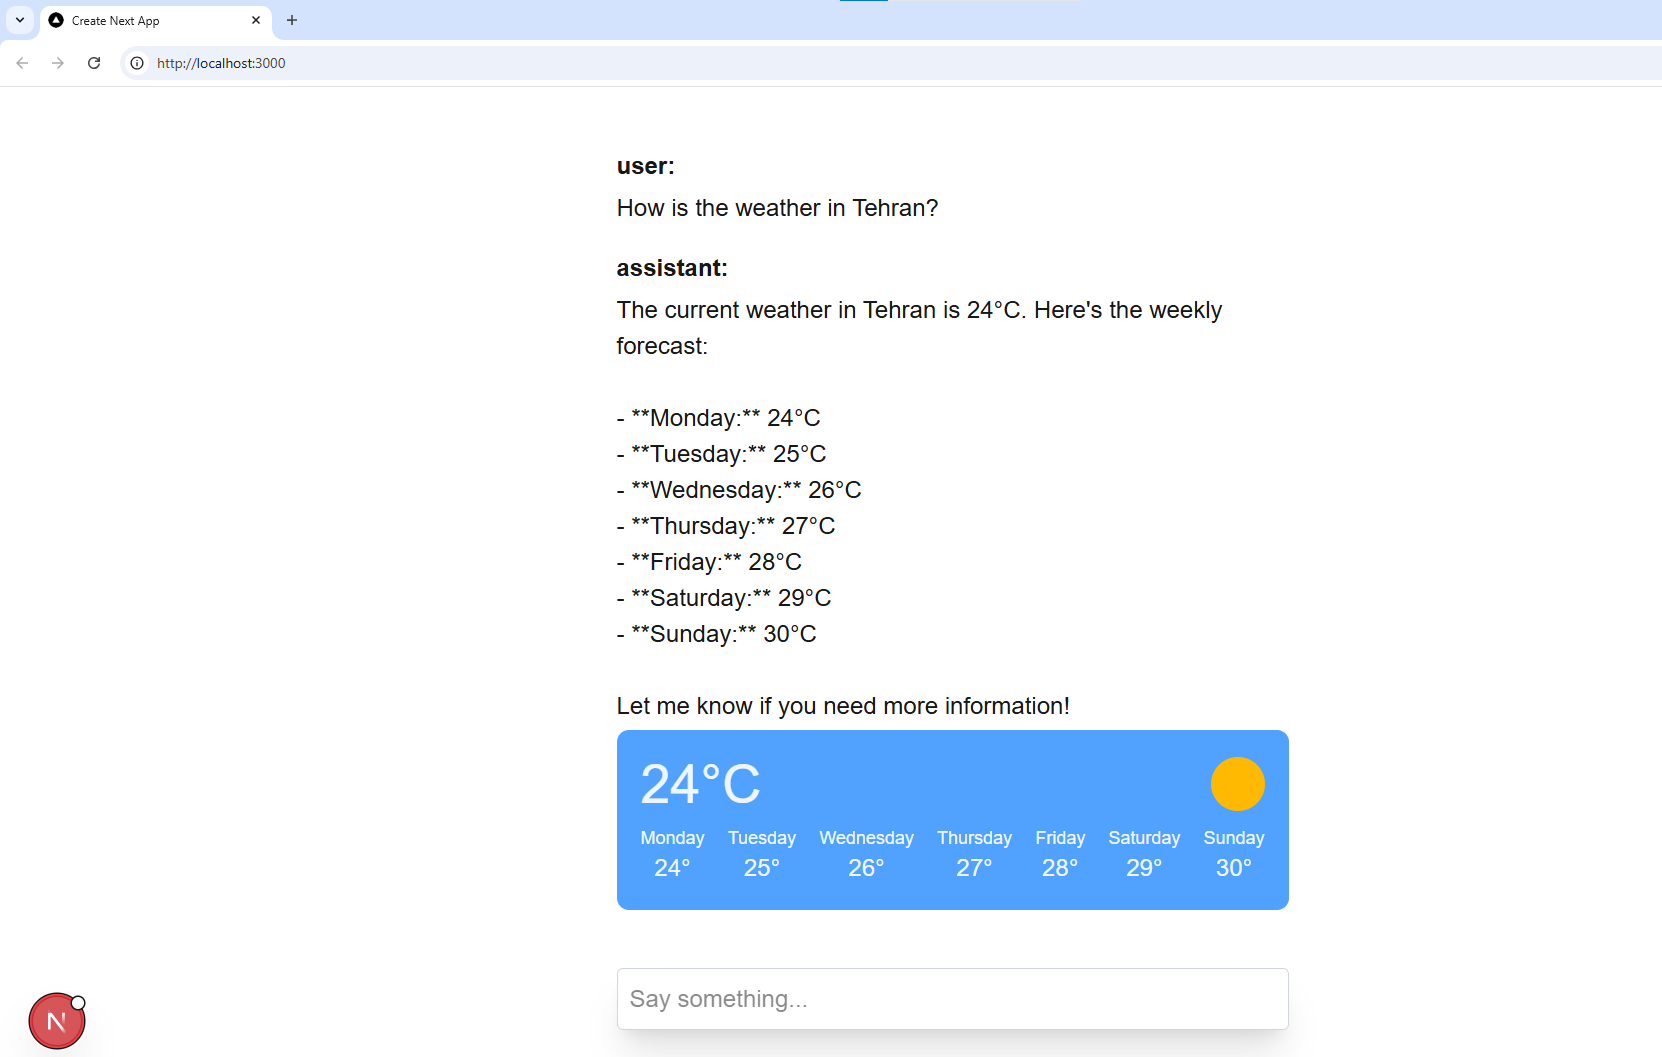
بیایید یک دستیار بسازیم که با فراخوانی یک Tool به نام getWeatherInformation، اطلاعات آبوهوا را برای هر شهری دریافت کند. بهجای بازگرداندن متن در هنگام فراخوانی Tool، شما یک کامپوننت React رندر خواهید کرد که اطلاعات آبوهوا را در سمت کلاینت نمایش میدهد.
در مسیر app/page.tsx، قطعه کد زیر را قرار دهید:
// npm i @ai-sdk/react@^1.2.12
'use client';

import { ToolInvocation } from 'ai';
import { Message, useChat } from '@ai-sdk/react';

export default function Chat() {
  const { messages, input, handleInputChange, handleSubmit, addToolResult } =
    useChat({
      api: '/api/use-chat',
      maxSteps: 5,

      // run client-side tools that are automatically executed:
      async onToolCall({ toolCall }) {
        if (toolCall.toolName === 'getLocation') {
          const cities = [
            'New York',
            'Los Angeles',
            'Chicago',
            'San Francisco',
          ];
          return cities[Math.floor(Math.random() * cities.length)];
        }
      },
    });

  return (
    <div className="flex flex-col w-full max-w-md py-24 mx-auto stretch gap-4">
      {messages?.map((m: Message) => (
        <div key={m.id} className="whitespace-pre-wrap flex flex-col gap-1">
          <strong>{`${m.role}: `}</strong>
          {m.content}
          {m.toolInvocations?.map((toolInvocation: ToolInvocation) => {
            const toolCallId = toolInvocation.toolCallId;

            // render confirmation tool (client-side tool with user interaction)
            if (toolInvocation.toolName === 'askForConfirmation') {
              return (
                <div
                  key={toolCallId}
                  className="text-gray-500 flex flex-col gap-2"
                >
                  {toolInvocation.args.message}
                  <div className="flex gap-2">
                    {'result' in toolInvocation ? (
                      <b>{toolInvocation.result}</b>
                    ) : (
                      <>
                        <button
                          className="px-4 py-2 font-bold text-white bg-blue-500 rounded hover:bg-blue-700"
                          onClick={() =>
                            addToolResult({
                              toolCallId,
                              result: 'Yes, confirmed.',
                            })
                          }
                        >
                          Yes
                        </button>
                        <button
                          className="px-4 py-2 font-bold text-white bg-red-500 rounded hover:bg-red-700"
                          onClick={() =>
                            addToolResult({
                              toolCallId,
                              result: 'No, denied',
                            })
                          }
                        >
                          No
                        </button>
                      </>
                    )}
                  </div>
                </div>
              );
            }

            // other tools:
            return 'result' in toolInvocation ? (
              toolInvocation.toolName === 'getWeatherInformation' ? (
                <div
                  key={toolCallId}
                  className="flex flex-col gap-2 p-4 bg-blue-400 rounded-lg"
                >
                  <div className="flex flex-row justify-between items-center">
                    <div className="text-4xl text-blue-50 font-medium">
                      {toolInvocation.result.value}°
                      {toolInvocation.result.unit === 'celsius' ? 'C' : 'F'}
                    </div>

                    <div className="h-9 w-9 bg-amber-400 rounded-full flex-shrink-0" />
                  </div>
                  <div className="flex flex-row gap-2 text-blue-50 justify-between">
                    {toolInvocation.result.weeklyForecast.map(
                      (forecast: any) => (
                        <div
                          key={forecast.day}
                          className="flex flex-col items-center"
                        >
                          <div className="text-xs">{forecast.day}</div>
                          <div>{forecast.value}°</div>
                        </div>
                      ),
                    )}
                  </div>
                </div>
              ) : toolInvocation.toolName === 'getLocation' ? (
                <div
                  key={toolCallId}
                  className="text-gray-500 bg-gray-100 rounded-lg p-4"
                >
                  User is in {toolInvocation.result}.
                </div>
              ) : (
                <div key={toolCallId} className="text-gray-500">
                  Tool call {`${toolInvocation.toolName}: `}
                  {toolInvocation.result}
                </div>
              )
            ) : (
              <div key={toolCallId} className="text-gray-500">
                Calling {toolInvocation.toolName}...
              </div>
            );
          })}
        </div>
      ))}

      <form onSubmit={handleSubmit}>
        <input
          className="fixed bottom-0 w-full max-w-md p-2 mb-8 border border-gray-300 rounded shadow-xl"
          value={input}
          placeholder="Say something..."
          onChange={handleInputChange}
        />
      </form>
    </div>
  );
}
سرور
در مسیر app/api/use-chat/route.ts، قطعه کد زیر را قرار دهید:
// npm i @ai-sdk/openai@^1 ai@^4 zod

import { createOpenAI } from '@ai-sdk/openai'
import { streamText } from 'ai';
import { z } from 'zod';

const my_model = createOpenAI({

  baseURL: process.env.BASE_URL!,
  apiKey: process.env.LIARA_API_KEY!,
});

export async function POST(request: Request) {
  const { messages } = await request.json();

  const result = streamText({
    model: my_model('openai/gpt-4o-mini'),

    messages,
    tools: {
      // server-side tool with execute function:
      getWeatherInformation: {
        description: 'show the weather in a given city to the user',
        parameters: z.object({ city: z.string() }),
        execute: async ({}: { city: string }) => {
          return {
            value: 24,
            unit: 'celsius',
            weeklyForecast: [
              { day: 'Monday', value: 24 },
              { day: 'Tuesday', value: 25 },
              { day: 'Wednesday', value: 26 },
              { day: 'Thursday', value: 27 },
              { day: 'Friday', value: 28 },
              { day: 'Saturday', value: 29 },
              { day: 'Sunday', value: 30 },
            ],
          };
        },
      },
      // client-side tool that starts user interaction:
      askForConfirmation: {
        description: 'Ask the user for confirmation.',
        parameters: z.object({
          message: z.string().describe('The message to ask for confirmation.'),
        }),
      },
      // client-side tool that is automatically executed on the client:
      getLocation: {
        description:
          'Get the user location. Always ask for confirmation before using this tool.',
        parameters: z.object({}),
      },
    },
  });

  return result.toDataStreamResponse();
}
متغیرهای محیطی BASE_URL و LIARA_API_KEY همان baseUrl سرویس هوش مصنوعی لیارا و کلید API لیارا هستند که باید در بخش متغیرهای محیطی برنامه خود، آنها را تنظیم کنید.
خروجی برنامه فوق:
پروژه فوق را میتوانید بهصورت کامل در گیتهاب لیارا، مشاهده کنید.